Updated: 12/2/2018 | December 2nd, 2018
Today, professional photographer Laurence Norah of Finding the Universe, continues his five-part series on taking better travel photos. Photographs are important for the memories they represent so Laurence is here to help us take better pictures! Part two of the series is on how to get the perfect shot.
In my first post in this series, I talked about the key compositional rules that you can use to create better travel photos. If you’re new to this series, I recommend you start there.
Today I’ll be covering how to deal with challenging light and some introducing some advanced ideas for controlling your composition, including being selective with your focus and making objects seem closer together than they are.
Then I’m going to get into specific tips for common travel scenes to get you taking better photos faster.
I’ll begin, though, by talking about the most crucial element of photography — the light. The middle of a sunny day might seem perfect for photography. In truth, it’s the worst time to take pictures — the light is harsh, shadows are challenging, and your photos will not do your subjects justice.
The best times to shoot are closer to sunrise and sunset when the light is soft and warm. These times are known as “the golden hour.”
You can’t be everywhere at the right time for the perfect light, especially when traveling. Here’s how to get the best shot from a bad lighting situation.
12 Ways to Take Better Photos
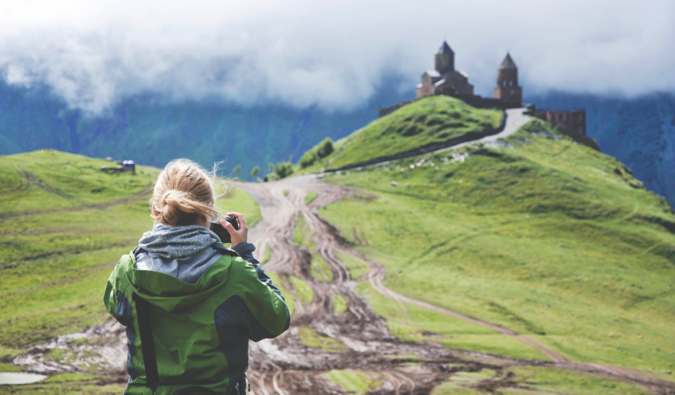
1. Be Aware of the Sun
This is the most important tip of the lot. Ideally, you want the sun behind you so that your subject is fully lit. If the sun is behind your subject you’ll end up with a much darker, poorly lit image. While this can be done intentionally for effect, for most shots you’ll want the sun to properly light your subject. To do that, position yourself so you are between the sun and your subject, as I did in this shot from my journey around New Zealand:
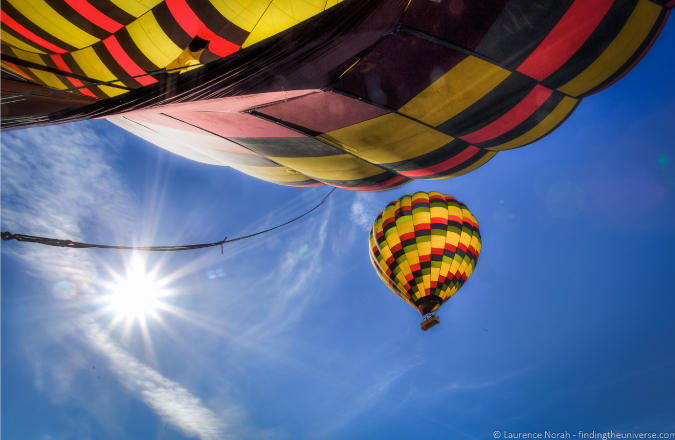
2. Get Creative
Don’t just take the same shot every time. Mix it up and get creative. Instead of having the sun behind you, take advantage of the harsh light for a more interesting image. Try shooting into the sun to create silhouettes, or use a high aperture to create a starburst effect, like in this Napa Valley balloon photo:
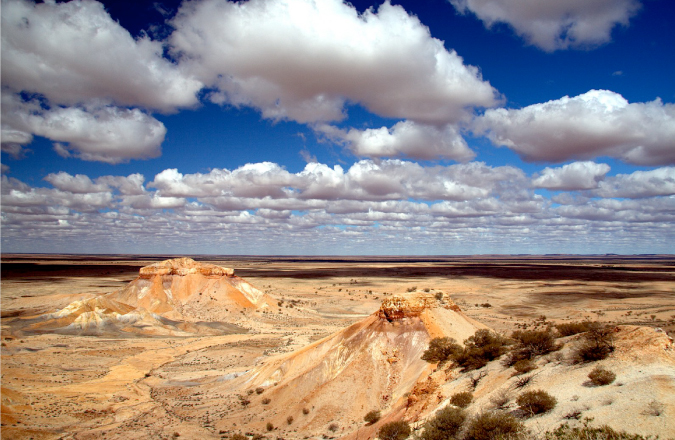
3. Use the Weather
Think about how you can use the weather to your advantage. How can you embrace a grey sky or a rainy landscape to capture a unique photo? How can you snap a picture of a blue sky without it being boring? Be aware of the weather so you can adjust your style and subject accordingly. For example, when the sun is behind clouds, the light is diffused. Clouds also add interest and scale to otherwise plain, boring skies, as in this shot of the Painted Desert in Australia:
4. Seek Shade
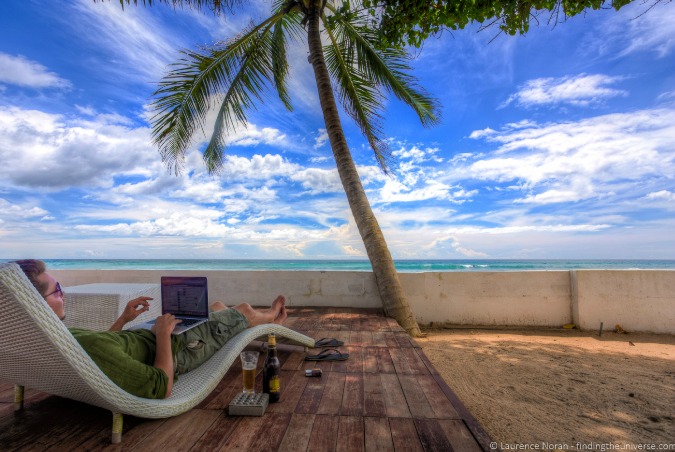
If you’re taking pictures of people, find somewhere shady. Here the light will be more even, with fewer harsh shadows on faces. You’ll get a much smoother and more balanced photo. Just make sure you are mindful of where your light is and how dark your subject will be. Here’s an example from the middle of the day in Sri Lanka:
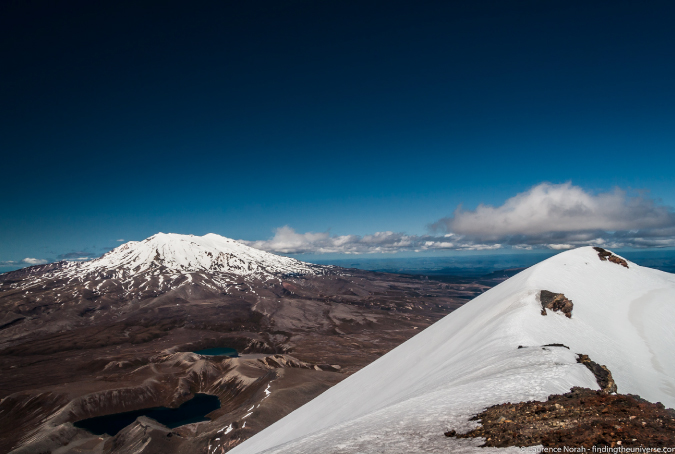
5. Master Depth of Field
Depth of field is all about controlling which parts of the shot are in focus. It’s one of the most important photography concepts you’ll need to know if you want to improve your travel photography and capture that perfect shot. Mastering depth of field will allow you to compose a variety of shots just by changing where your focus is. For example, check out this shot of a monkey:
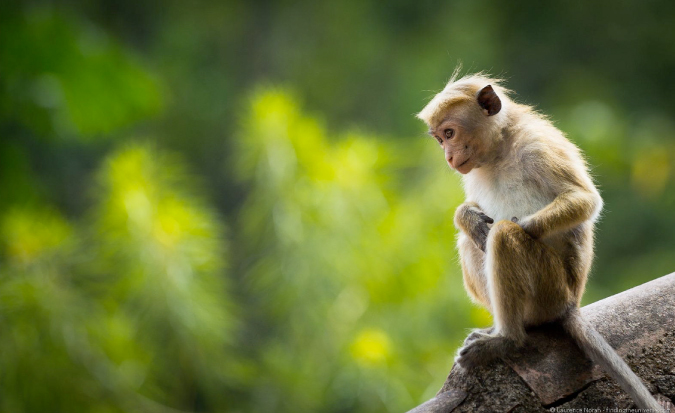
As you can see, only the monkey is in focus. This is known as a “shallow” depth of field and is used to isolate subjects and make the shot about them.
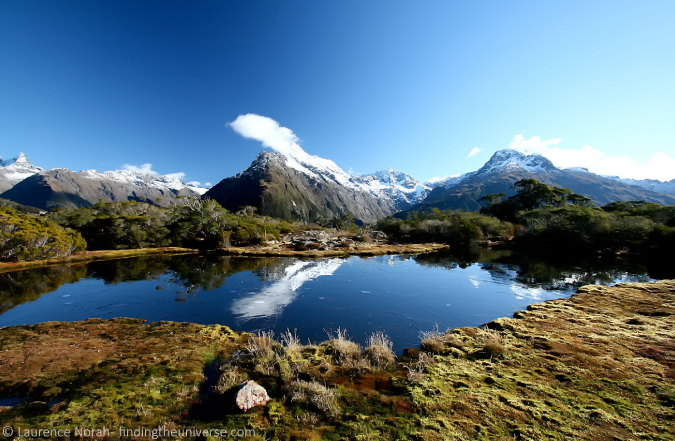
A wide depth of field is for shooting landscapes and scenery. Here’s a shot from New Zealand where I used a wide depth of field to get much more of the scene in focus:
To manipulate depth of field on your camera you need to change the aperture — check your manual for how to do that. Typically it will be marked as “Av” or “A” on your mode dial.
Some smartphones allow you to manually set your aperture, either through the built-in camera app, or by downloading an advanced app from your device’s app store.
A wide-open aperture (f/4 and lower) produces a shallower depth of field (less of the shot will be in focus), and a smaller aperture (f/8 and higher) puts more of the scene in focus.
There are plenty of tutorials on the Internet about depth of field; take a look here for a more detailed explanation, and here for a depth of field simulator to get more of a handle on what it is.
6. Utilize Street Scenes
Street photography is about capturing moments — immersing yourself in environments and finding interesting stories.
Patience and politeness are key to successful street shots involving people — not everyone wants to have their photograph taken, and it may be illegal to do so without explicit permission. If no one wants their photo taken, try wider crowd shots, or focus in on market goods — colorful spice piles or unusual-looking goods are always interesting subjects. Alternatively, shoot the streets themselves. Doorways or intriguing architecture are a nice starting point — take this street in Bologna, Italy, for example:
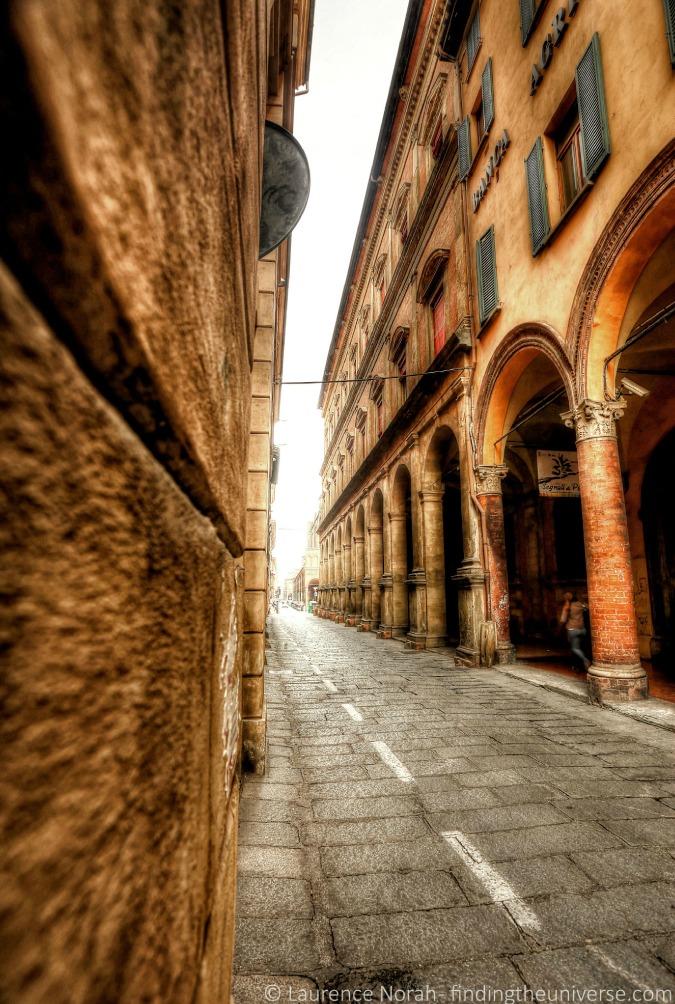
As for the settings, use a wider depth of field (smaller aperture) for general street scenes.
7. Learn to Photograph People
If you’re looking for portraits, your best bet is to make friends with people. Learn about them and their stories, then ask for that permission.
I prefer taking pictures of people I know, as I generally don’t have to worry about permission problems.
My favorite style of people photos is “candid,” unposed shots. This is the best way, in my opinion, of capturing the personality of people.

The key to the art of unobtrusive photography is persistence, patience, and keeping your eyes open to the photographic possibilities around you. Anticipating the moments that might be about to happen is key.
I’d advise a shallow depth of field (wide aperture) and fast shutter speeds for portraits and action shots of people.
8. Use Beaches
Beaches are one of my favorite spots to shoot sunsets — nothing quite beats the sun setting over the sea! The water and the wet sand make for great reflection opportunities.
Think carefully about your composition, and in particular the foreground and mid-ground of your shot, as I talked about in the composition post. Try different angles, and maybe get above your subject to present the beach in the context of its environment, like this shot of Hellfire Beach in Western Australia:

Outside of sunset, beaches can be very bright environments, so you may need to adjust your exposure to compensate. Most cameras and phones let you shift exposure left or right manually with a button that looks like +/-, or from inside the app.
If you are shooting friends and can’t find shade, consider setting your camera’s flash to “fill” setting to compensate. This uses the flash to light up the shadows caused by the sun, and can make portraits shot into the sun look more pleasing.
Finally, take care of your gear. Fine sand and salt water don’t agree with most camera equipment! Here are some more beach photography tips to get you started.
9. Master Taking Pictures of Landscapes
There are two things that helped my landscape photography improve: a tripod and a polarizing filter (if you’re interested in my photography equipment, here’s a full list of my travel photography gear).
Controlling depth of field is a key part of landscape photography. Unfortunately, as you increase the aperture the shutter speed becomes slower — to the point where your hand movement can result in a blurry image. This is why you need a tripod.
Read more about how shutter speed, ISO (light sensitivity setting), and aperture are linked in this article on the exposure triangle.
A polarizing filter is fantastic for making blue skies and clouds pop, and for controlling reflections. It also reduces the amount of light entering the camera, so that tripod is even more helpful.
If the above two sound like too much effort, don’t worry. You can improve your landscape photography no end by thinking seriously about your composition. Leading lines, the rule of thirds, and finding a sense of scale by putting subjects in your foreground or mid-ground are key.
10. Learn How to Use Low light
So often we’re out with friends at night and want to capture those moments together, but we can’t seem to get anything other than a blurry mess.
This is because most cameras aren’t great when working with the amount of light that’s available at night —they use slow shutter speeds that turn movement into blurs.
More expensive equipment can make a real difference for low-light photography. All is not lost if your pockets aren’t deep enough, though. First, you can increase the ISO setting on your camera. While this will reduce the quality of your shots, they will look better than blurry photos.
Another idea is to find something to rest your camera on. If you don’t have a tripod, try and find an alternative — anything that is stationary and not prone to shake like your hand does. Then, use your camera’s timer function to take the shot. If you’re taking pictures of people, get them to stand as still as possible!
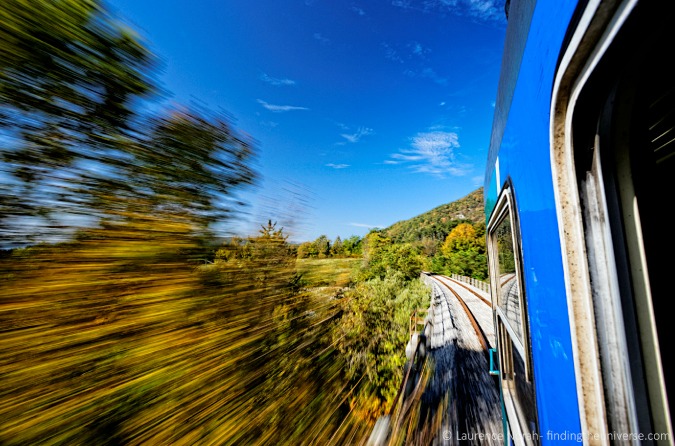
11. Get Action Shots
For better action photos, you have two options. One is to use a fast shutter speed to “freeze” the action — such as a shot of a hummingbird in flight, or a surfer on a wave.
The other option is to show the motion by using a longer shutter speed — the resulting blur will convey a sense of action to your viewer.
In this shot of a train, I manually set the shutter speed to 1/30th of a second, slow enough that the trees at the edge of the shot would seem to be rushing past as I leaned out of the window, yet fast enough that the train itself would remain sharp, even handheld. I think this worked pretty well!
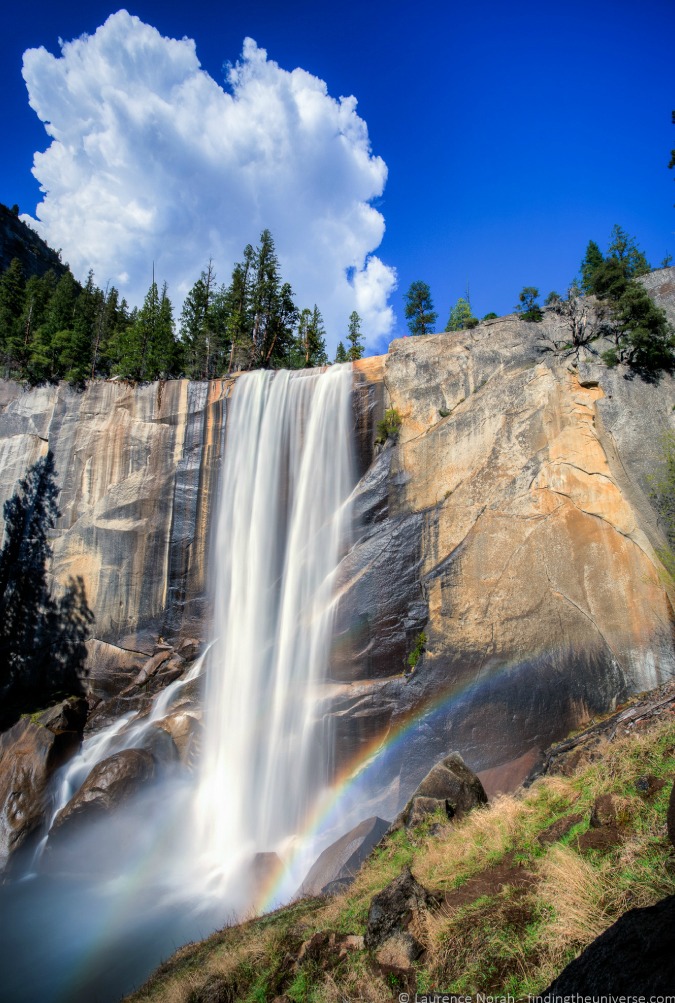
12. Take Pictures of Waterfalls
Waterfalls are a fantastic photography subject. My favorite way to shoot them is with a slow shutter speed, creating a soft and fluffy effect. Shutter speeds of 1/15th of a second and slower give the best results — you’ll need to use a tripod or rest your camera on something to avoid blur from your hand movement.
Another good way to shoot waterfalls is from far away using a long lens, using compression to create a sense of drama around your subject. Or, go the other way, and shoot super-wide, taking in the full glory of the scene.
Finally, don’t forget to use the light. All that flowing water can cause beautiful rainbows, as seen in this shot of Vernal Falls in Yosemite:
When you do, you will have much greater creative control over your photography.
Laurence started his journey in June 2009 after quitting the corporate life and looking for a change of scenery. His blog, Finding the Universe, catalogs his experiences and is a wonderful resource for photography advice! You can also find him on Facebook, Instagram, and Twitter.
Travel Photography: Learn More Tips
For more helpful travel photography tips, be sure to check out the rest of Laurence’s travel photography series:
- Part 1 – How to Take Professional Travel Photos
- Part 2 – How to Shoot the Perfect Travel Photograph
- Part 3 – How to Buy the Best Camera Gear
- Part 4 – How to Take the Perfect Photo: Advanced Techniques
- Part 5 – 7 Editing Tips to Improve Your Travel Photographs
LEARN TO GET OUT OF AUTO!
 If you are looking to really get into photography and want to master your camera and take amazing photos when you travel, Laurence and I have developed a comprehensive photography course that will get you out of auto and have your friends go “Wow! That’s really breathtaking!” in no time. Click here to learn more about it!
Book Your Trip: Logistical Tips and Tricks
Book Your Flight
Find a cheap flight by using Skyscanner or Momondo. They are my two favorite search engines because they search websites and airlines around the globe so you always know no stone is left unturned.
Book Your Accommodation
You can book your hostel with Hostelworld. If you want to stay elsewhere, use Booking.com as they consistently return the cheapest rates for guesthouses and cheap hotels. I use them all the time.
Don’t Forget Travel Insurance
Travel insurance will protect you against illness, injury, theft, and cancellations. It’s comprehensive protection in case anything goes wrong. I never go on a trip without it as I’ve had to use it many times in the past. I’ve been using World Nomads for ten years. My favorite companies that offer the best service and value are:
- World Nomads (for everyone below 70)
- Insure My Trip (for those over 70)
Looking for the best companies to save money with?
Check out my resource page for the best companies to use when you travel! I list all the ones I use to save money when I travel – and I think will help you too!
The post 12 Ways to Shoot the Perfect Travel Photograph appeared first on Nomadic Matt's Travel Site.
No comments:
Post a Comment