
Updated: 12/2/2018 | December 2nd, 2018
Travel photography. It’s not something I’ve very good at. I take all my pictures on an iPhone and, if they aren’t used on the blog, they mostly just sit on my hard drive. I’ve never taken the time to really improve my skills. Like learning a language, improving your photography takes time.
Luckily, just like learning a language, anyone can do it!
Travel photographs are memories. You look at a picture and it conjures up thoughts, feelings, and smells that take you back to a long forgotten place. I think it’s important we all spend a little time improving our travel photography.
Today, professional photographer Laurence Norah of Finding the Universe begins a five-part series on how to become a better photographer and take better travel photos. He’s going to share his top travel photography tips to help you improve your skills and take awesome travel photos.
Enter Laurence…
In 2009, I gave up my job in IT and set off to travel the world. My first destination was Australia, a stunning country where I desperately wanted to capture my adventures. I’d been taking photos since I was 13, but it was only on this trip that I started to focus on learning the art of photography and realized that this was something I could be truly passionate about.
I quickly learned the reality that photography is a skill that takes time, effort, and practice to master.
It’s also not a question of gear — great travel photography is very much about the photographer.
In this post, I’ll give you the 8 simple tavel photography tips you need to take better pictures right away. If you follow these rules, you won’t go wrong!
Table of Contents
1. Composition: Taking Pictures People REALLY Want
Patterns: the human brain is a sucker for them. We’re always looking for patterns — be they shapes in the clouds, symmetry in buildings, or colors that compliment each other. There’s just something about a pattern that our brains love.
Understanding these patterns and what pleases the human brain is a nifty shortcut to taking better photos. And that’s what composition in photography is all about. Learn and apply the rules below, and you’ll start taking more photos that people will enjoy.
Before launching into them, though, some important basics. First, ensure that your camera is level. You don’t want wonky horizons. Your brain generally doesn’t like them; they’re the visual equivalent of nails on a chalkboard.
Next — stop moving. You want to be as still as possible when shooting to avoid blurry images. Hold your camera with both hands and be steady, or use a tripod.
2. The Rule of Thirds
One of the most important rules of composition is known as the rule of thirds.
I learned recently that this is based on how babies learn to identify their mothers’ faces, which can be split up into three parts, comprising the eyes, nose, and mouth.
The rule of thirds requires you to break an image into three equal parts either vertically, horizontally or both. The goal is to place key compositional elements into those thirds.
On your device, find the setting to enable a grid over the preview screen. Four lines will appear, two vertical and two horizontal.
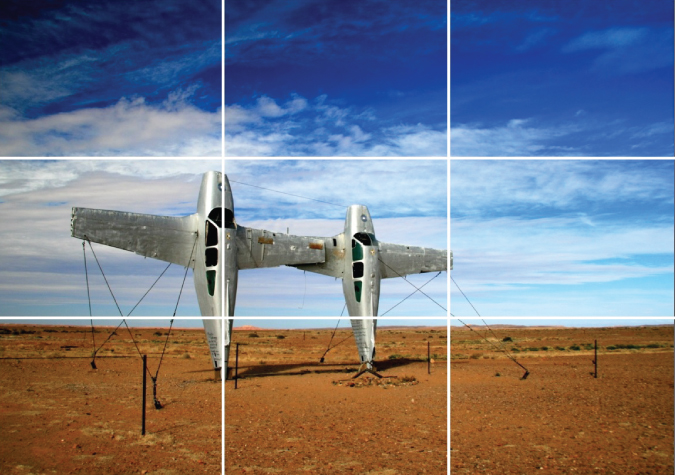
Take a look at my shot above of a surreal sculpture park deep in the Australian outback, over which I have overlaid a grid to demonstrate the horizontal and vertical thirds.
With the grid, you can see how I have composed the image: one-third land and two-thirds sky, while the plane on the left is on the left-hand grid line, close to the intersection of two lines.
Placing subjects on the intersecting points will naturally draw the viewer’s eye to them, as these points are usually where we focus first in an image, and doing so is a great starting point for a good composition.
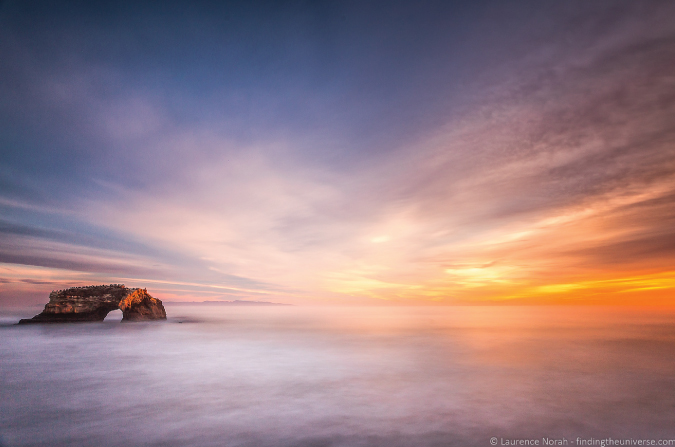
Another of my favorite subjects to shoot is a sunset. I love how they are always different and how wonderful the light is at that time of day.
To get a great sunset shot, you can easily apply the rule of thirds — composing the shot with two-thirds sky, and one-third land or sea. You want to avoid splitting the image half and half, as it won’t look as good. The shot below of a sunset in Santa Cruz illustrates this and also has an interesting subject in the left third of the image.
3. Leading Lines
When composing a photograph, you want to make it as easy as possible for the person looking at it to figure out the subject and focus of the image.
One way to do this is with leading lines — the use of natural geography or other features that the viewer will naturally look at first and which will lead their eyes to the main subject.
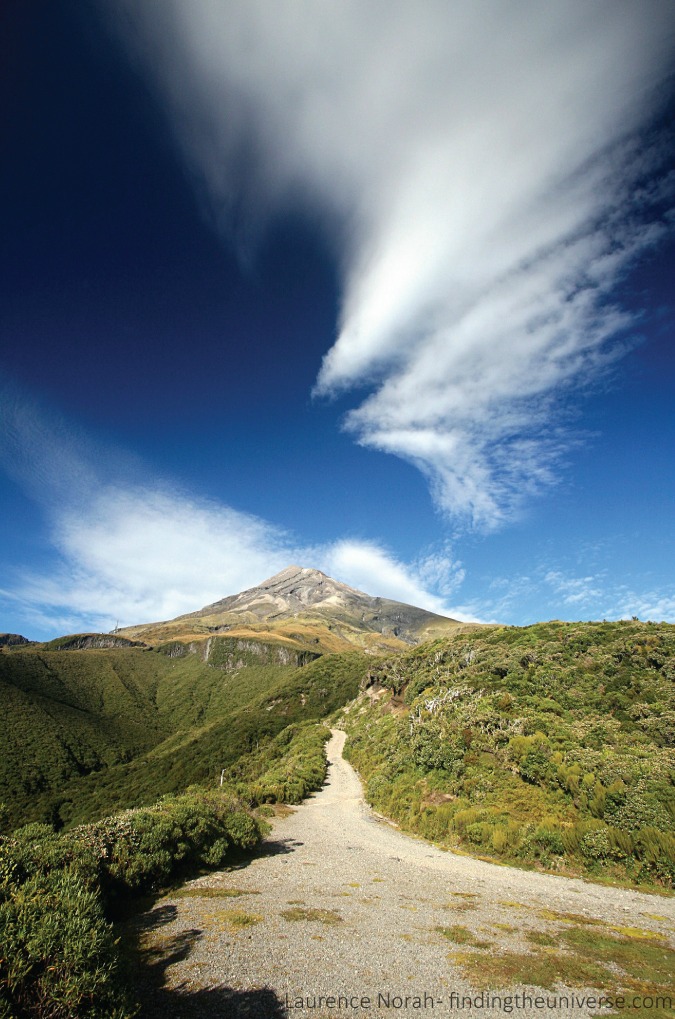
Roads are excellent as leading lines, particularly in big landscape shots. When I was traveling in New Zealand, I wanted to create a photographic story of the hike up Mount Taranaki, one of my favorite New Zealand hikes. Near the start of hike, the walking trail itself gave me a perfect leading line to illustrate the journey ahead, drawing the viewer’s eye into the frame and up to the mountain.
Another good illustration of a leading line is this shot of me walking on railway tracks in Italy. Obviously, it’s only advisable on either disused or somewhat infrequently used tracks!
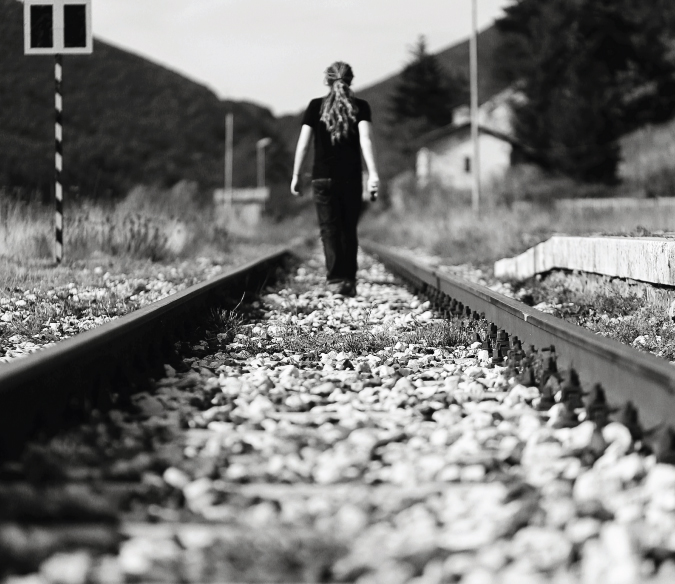
The goal for this image was a self-portrait that evoked my life of travel. The parallel tracks, which appear to converge, were perfect for leading the viewer’s eye to the subject — me. I felt I captured the imagery of wanderlust that I was looking for by using them.
4. Foreground, Midground, and Background
Have you ever taken a picture of a mountain or city skyline and then looked at it later and wondered why it doesn’t manage to convey the majesty of what you were looking at?
This is likely because your photograph is a two-dimensional image and you have lost the sense of scale that is apparent when you are present and in the moment.
When composing a shot — and this is particularly true for landscape photography — think about the different elements in the foreground, midground, and background of the shot.
Here’s an example of a sunset in Glencoe, Scotland, easily the most stunning place I’ve photographed in 2015.
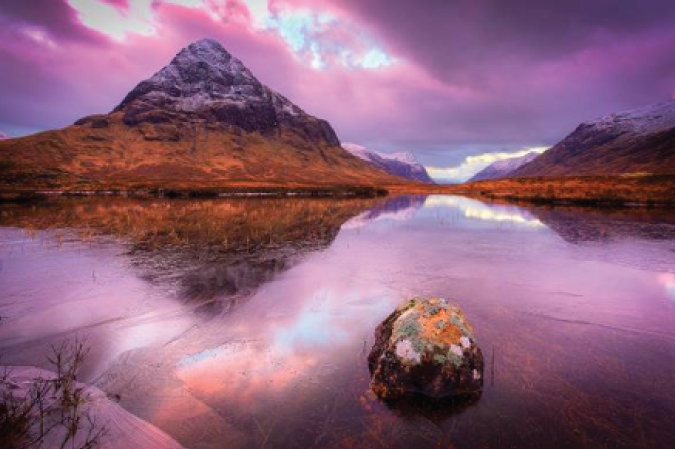
I used the rock in this frozen lake to provide something interesting in the foreground, helping to provide scale and balance to the overall image. The viewer’s eye is drawn to the rock, and then likely to the mountain and sunset, before heading into the distance of the valley.
When you are out and about in the world, think about everything around you. If you see a far-off mountain you want to shoot, look around and see if you can find something interesting in the foreground or midground to incorporate into the shot. If you’re near a river, maybe that could be a canoe. Elsewhere it could be a house. Or a group of sheep. Or a car starting to scale a winding road.
If you’re shooting a city scene, look at what is happening all around you. Street vendors, different modes of transport, and signs and storefronts can all be incorporated as foreground to provide context and scale for your city skyline or that interestingly shaped building.
If you can’t find something, be creative. Find someone to stand in your shot to provide that scale. If you’re travelling with a tripod, do what I did in that railway shot and use yourself as the subject. Just remember not to confuse your viewer too much with too many compositional elements, and keep it clear what the photo is of.
Thinking beyond the big background parts of the image and focusing on the smaller elements will help you create more balanced, pleasing images.
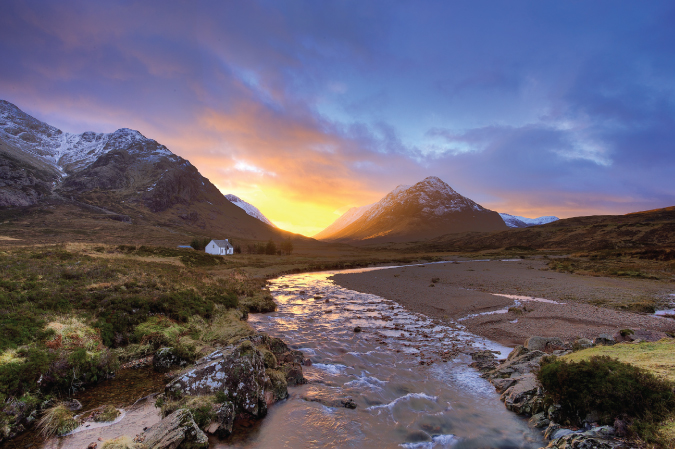
Another shot from Glencoe. Here the house provides that midground scale, while the river works both as an interesting foreground subject and as a leading line to draw you into the photograph.
5. Framing
This compositional technique isn’t about hanging a picture in a frame; it’s about using what’s around you to “frame” the subject you are trying to capture, illustrating to the viewer what the shot is of and drawing their eyes into the scene.
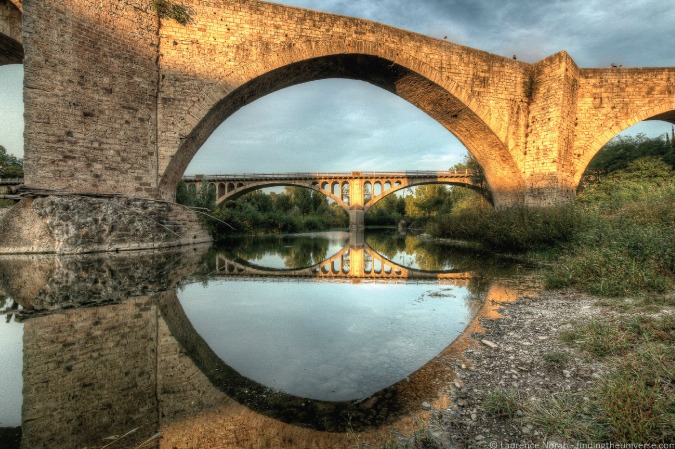
In this shot of the bridge into the medieval town of Besalú in Spain, I used the old bridge and its reflection as a natural frame for the newer bridge.
When you have found your subject, look around to see if there’s a way you can frame it creatively. Some good options for framing include vegetation, like tree branches and trees, as well as doors and windows.
Take a look at this shot of a temple in Ayutthaya, Thailand, to see what I mean. I wanted to capture the beauty of this temple scene while drawing the viewer into the wat in the center.
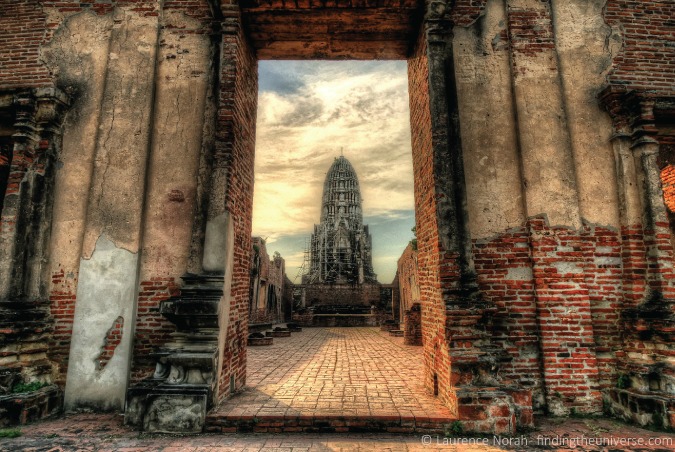
The frame in this case is much larger than the subject, but it is never unclear what the shot is of. This is a really easy photography technique, but it might require you to scout around, or step back from your subject, to find a good way to frame it. Don’t be afraid to stand further away and use the zoom on your lens to get the frame you want.
As another example, using trees to frame a waterfall, here’s a shot of Lower Yosemite Falls in Yosemite National Park.
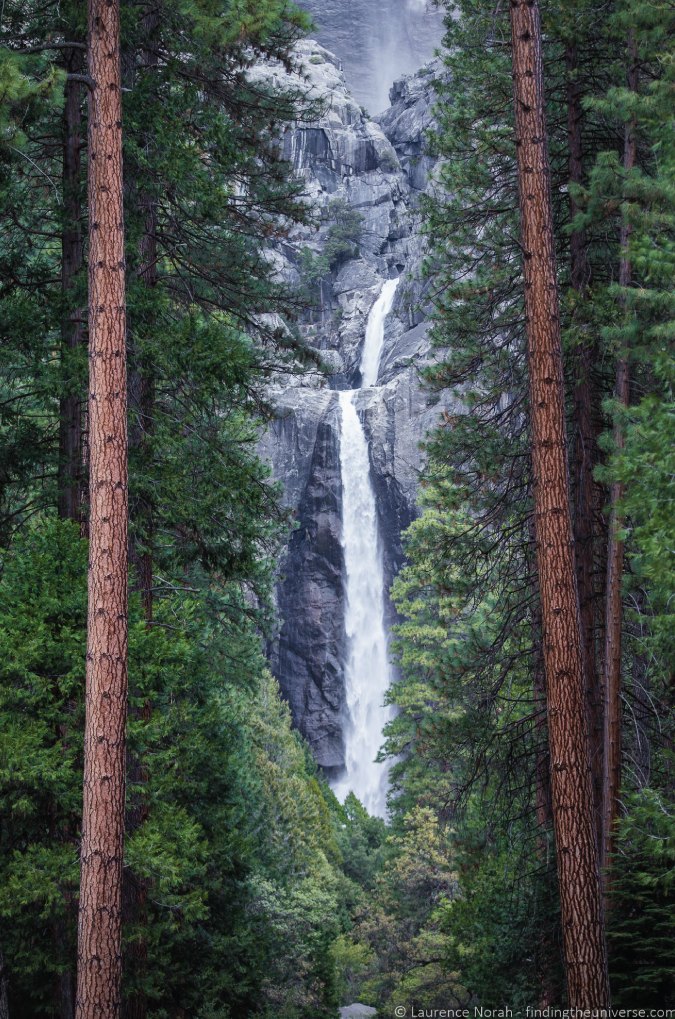
I felt that the trees added much more to the shot with the waterfall between them. There was a pleasing symmetry to the shot with the two parallel trees.
There are many more options for framing. Experiment and see what works!
6. Focal Points
One way to be sure that people look at the part of the image you want them to look at is to have only that part of the image sharp and in focus and the rest blurry.
This is particularly effective for isolating people or animals in shots — take a look at wedding or sports photos of people, and you’ll see how often the subject of the shot is the only thing in focus.
I love shooting events with friends and family, and I find that this technique works really well at isolating the subject from a crowd and making it obvious who the photo is of.

To start with, you can achieve this effect with the “portrait” or “people” mode on your camera. You can see some more examples of subject isolation through focus here.
7. Use of Color
Color is really important in photography, particularly how different colors work well together. For example, blue works well with yellow (sunflowers in a field), and red works well with green (Christmas!).
To figure out which colors work well together, take a look at this color wheel.
Generally, colors opposite each other on the wheel will complement each other. These colors don’t need to be evenly balanced in a shot — often images work best with a small percentage of one and a greater percentage of another.
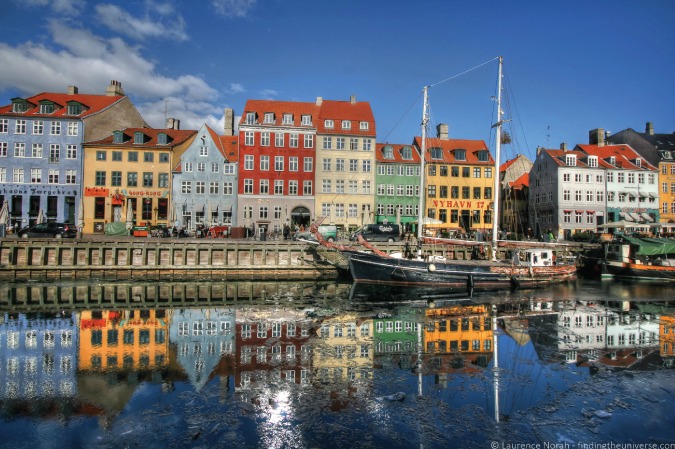
Take a look at the shot above, from Copenhagen’s gorgeous Nyhavn Harbor. You can see all sorts of colors, but in particular, the blue of the sky and water is the predominant color, with the houses’ reds and yellows (yellow is opposite blue on the color wheel) offering a counterpoint.
When you are on your travels, keep an eye out for contrasting and complimentary colors that you can incorporate into your shots. Spice markets, old European cities, rural meadows, and old colorful barns in green fields are a great place to start.
8. Storytelling
Remember that when you are taking a picture, you have all the background and surrounding knowledge of your trip in your mind. When you look at the image later, all of that will come back to you.
No one else has that advantage. To them, that shot of a waterfall is just that — a shot of a waterfall. The story of the five-hour hike there through a leech-infested jungle? Lost. The feeling of how refreshing it was on your skin when you took the plunge in to cool off? Also gone. It’s just a two-dimensional image on a screen, likely quickly flicked by to be replaced by the next image in the stream.
It’s your job to bring all that lost context to life.
We’re often told that a photograph is worth a thousand words. As a photographer, it’s your job to convey those words. Figure out how to tell that story with your image. Get the shots that pull your viewers into your stories. Use emotion, find and freeze moments, and incorporate the human element so your shots resonate with your viewers.
Take this monkey in Rio de Janeiro. These guys were being really cheeky with tourists, trying to get food from them and generally playing around as much as possible. I wanted to try and capture some of that, and I managed to get this monkey sticking its tongue out at me.

I’d advise spending time thinking about the shot you are trying to create, the moment you are trying to capture, and the story you are trying to tell your viewer. Put yourself into their shoes, imagine you are going to be looking at the shot with no other context, and try to build the shot from there.
This is probably one of the harder parts of photography, and — like the shot of the monkeys above — will likely require some time, patience, and luck. You will make errors. But with research and practice, you will be able to master it!
Practice makes perfect – and travel photography is no different in this regard! The more photos you take, the more you will learn how to compose and capture great shots. While reading some travel photography tips will definitely help, the key is to actually go out in the world and practice them. The more you practice, the faster this will all become second nature. It won’t happen overnight, but over time your skills will improve — I promise!
So what are you waiting for? Get out there and start taking some photos!
Laurence started his journey in June 2009 after quitting the corporate life and looking for a change of scenery. His blog, Finding the Universe, catalogs his experiences and is a wonderful resource for photography advice! You can also find him on Facebook, Instagram, and Twitter.
Travel Photography: Continue The Series
For more helpful travel photography tips, be sure to check out the rest of Laurence’s travel photography series:
- Part 1 – How to Take Professional Travel Photos
- Part 2 – How to Shoot the Perfect Travel Photograph
- Part 3 – The Best Camera Gear to Get
- Part 4 – How to Take the Perfect Photo: Advanced Techniques
- Part 5 – 7 Editing Tips to Improve Your Travel Photographs
LEARN TO GET OUT OF AUTO!
 If you are looking to really get into photography and want to master your camera and take amazing photos when you travel, Laurence and I have developed a comprehensive photography course that will get you out of auto and have your friends go “Wow! That’s really breathtaking!” in no time. Click here to learn more about the course and start today!
Book Your Trip: Logistical Tips and Tricks
Book Your Flight
Find a cheap flight by using Skyscanner or Momondo. They are my two favorite search engines because they search websites and airlines around the globe so you always know no stone is left unturned.
Book Your Accommodation
You can book your hostel with Hostelworld. If you want to stay elsewhere, use Booking.com as they consistently return the cheapest rates for guesthouses and cheap hotels. I use them all the time.
Don’t Forget Travel Insurance
Travel insurance will protect you against illness, injury, theft, and cancellations. It’s comprehensive protection in case anything goes wrong. I never go on a trip without it as I’ve had to use it many times in the past. I’ve been using World Nomads for ten years. My favorite companies that offer the best service and value are:
- World Nomads (for everyone below 70)
- Insure My Trip (for those over 70)
Looking for the best companies to save money with?
Check out my resource page for the best companies to use when you travel! I list all the ones I use to save money when I travel – and I think will help you too!
The post How to Take Professional Travel Photos appeared first on Nomadic Matt's Travel Site.
No comments:
Post a Comment